> ## Documentation Index
> Fetch the complete documentation index at: https://docs.codeant.ai/llms.txt
> Use this file to discover all available pages before exploring further.
# Setup
> Integrate Jira with CodeAnt AI
## Overview
Enhance your workflow by integrating Jira with CodeAnt AI to automatically create tickets directly from the CodeAnt dashboard.
## How to Configure
Follow these steps to set up the integration:
### 1. Generate an API Token
* **Visit**: [Atlassian API Tokens](https://id.atlassian.com/manage-profile/security/api-tokens)
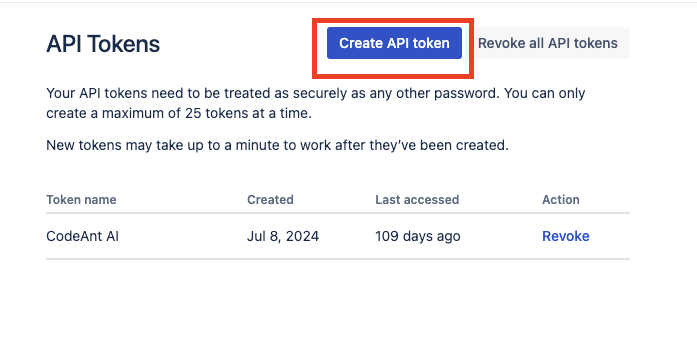
* **Create** a new API token by clicking on **Create API Token** and following the prompts.
* **Copy** the generated token and keep it handy for the next steps.
 #### Scoped Access Token Permissions
If you're using a scoped access token, ensure the following permissions are granted:
**Read Permissions:**
* `read:account`
* `read:jira-user`
* `read:jira-work`
* `read:me`
* `read:workflow:jira`
* `read:workflow-scheme:jira`
**Write Permissions:**
* `write:jira-work`
### 2. Obtain Your Project Key
* **Create** a new project in Jira or select an existing one.
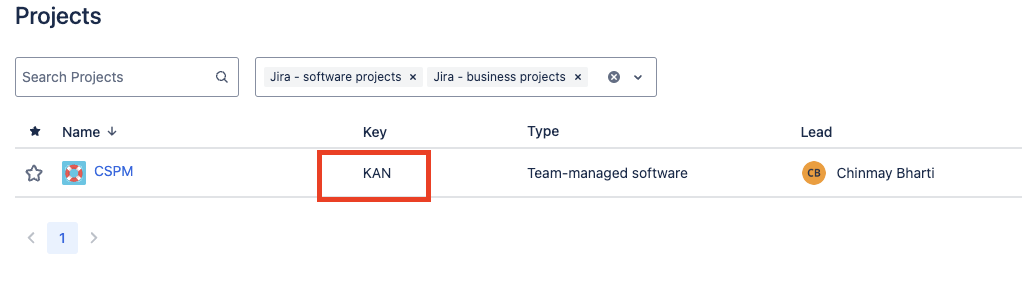
* **Locate** the project's key (a short identifier for your project).
#### Scoped Access Token Permissions
If you're using a scoped access token, ensure the following permissions are granted:
**Read Permissions:**
* `read:account`
* `read:jira-user`
* `read:jira-work`
* `read:me`
* `read:workflow:jira`
* `read:workflow-scheme:jira`
**Write Permissions:**
* `write:jira-work`
### 2. Obtain Your Project Key
* **Create** a new project in Jira or select an existing one.
* **Locate** the project's key (a short identifier for your project).
 ### 3. Set Up Integration in CodeAnt AI
* **Log in** to your account at [app.codeant.ai](https://app.codeant.ai).
* **Navigate** to **Settings** > **Jira Integration**.
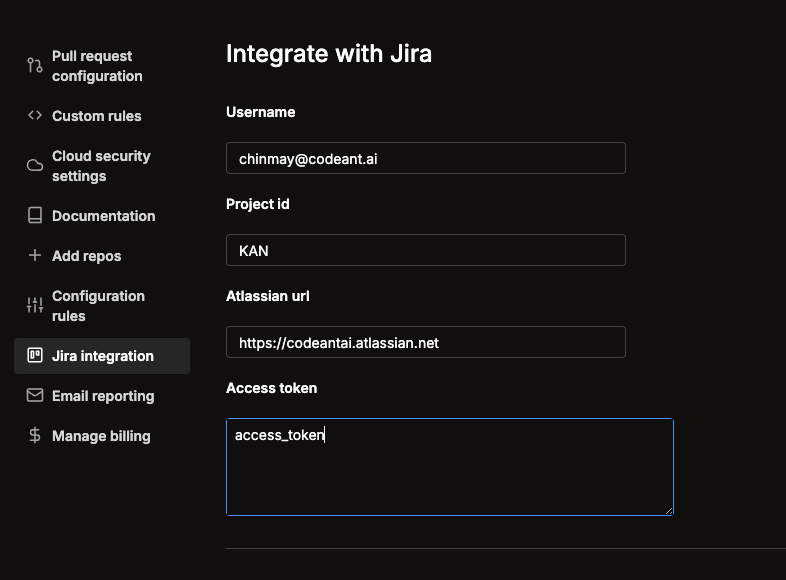
* **Enter** the following details:
* **Username**: Your Jira-associated email address.
* **Project Key**: The key obtained in step 2.
* **Atlassian URL**: Your Jira instance URL, including `https://` (e.g., `https://yourcompany.atlassian.net`).
* **Access Token**: Paste the API token from step 1.
* **Is this a scoped access token?**: If you're using a scoped access token (with the permissions listed in step 1), tick this checkbox.
* **Click** **Save** to apply the settings.
### 3. Set Up Integration in CodeAnt AI
* **Log in** to your account at [app.codeant.ai](https://app.codeant.ai).
* **Navigate** to **Settings** > **Jira Integration**.
* **Enter** the following details:
* **Username**: Your Jira-associated email address.
* **Project Key**: The key obtained in step 2.
* **Atlassian URL**: Your Jira instance URL, including `https://` (e.g., `https://yourcompany.atlassian.net`).
* **Access Token**: Paste the API token from step 1.
* **Is this a scoped access token?**: If you're using a scoped access token (with the permissions listed in step 1), tick this checkbox.
* **Click** **Save** to apply the settings.
 ### You're All Set!
You can now create Jira issues directly from the CodeAnt AI dashboard, streamlining your ticket creation process and improving productivity.
### You're All Set!
You can now create Jira issues directly from the CodeAnt AI dashboard, streamlining your ticket creation process and improving productivity.