> ## Documentation Index
> Fetch the complete documentation index at: https://docs.codeant.ai/llms.txt
> Use this file to discover all available pages before exploring further.
# Bitbucket Data Center
> Configure CodeAnt AI for Self-hosted Bitbucket Data Center
Follow these instructions to configure your self-hosted Bitbucket Data Center using Single Sign-On (SSO):
## Step 1: Access Self-Hosted and Sign In with SSO
* **Access the Self-Hosted Option**
* Visit [app.codeant.ai](https://app.codeant.ai/) and select the **Self-Hosted** option.
* Click on **Sign in with SSO**.
* Enter your company email (note: public emails like gmail.com or yahoo.com won't work).
* Retrieve the verification code sent to your email and enter it to complete authentication.
## Step 2: Select Bitbucket as Your Version Control Provider
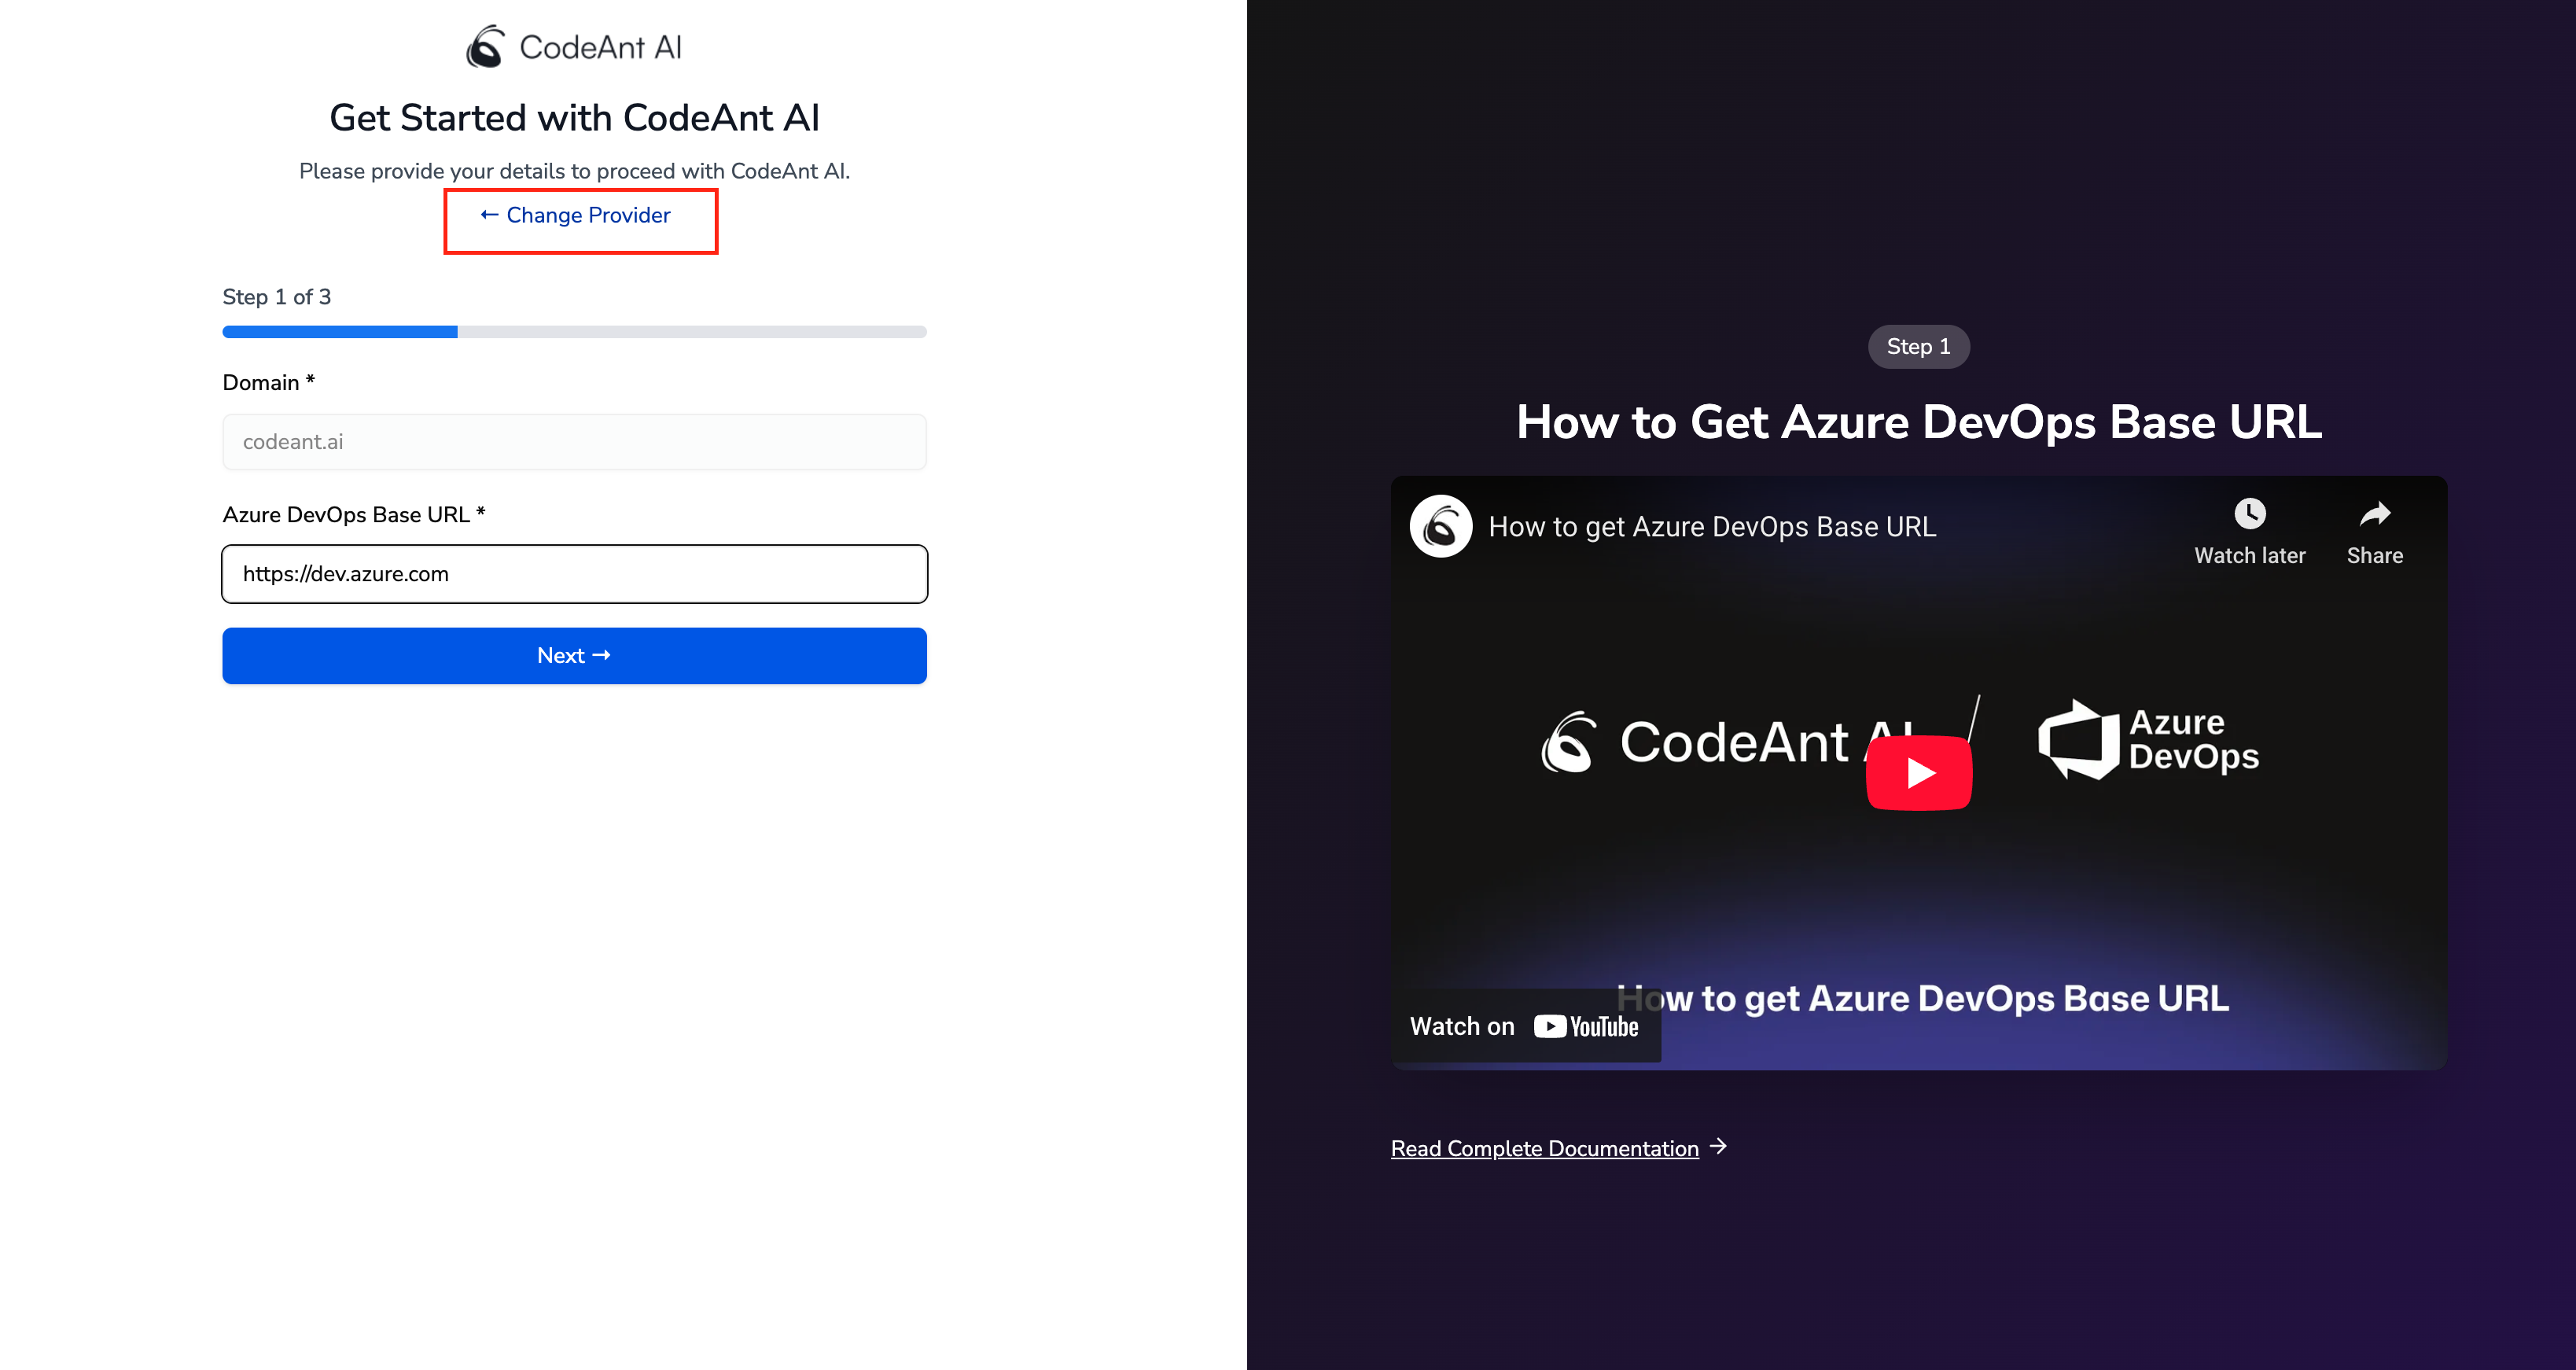
* After signing in with SSO, click on **Change Provider** to select a different version control system.
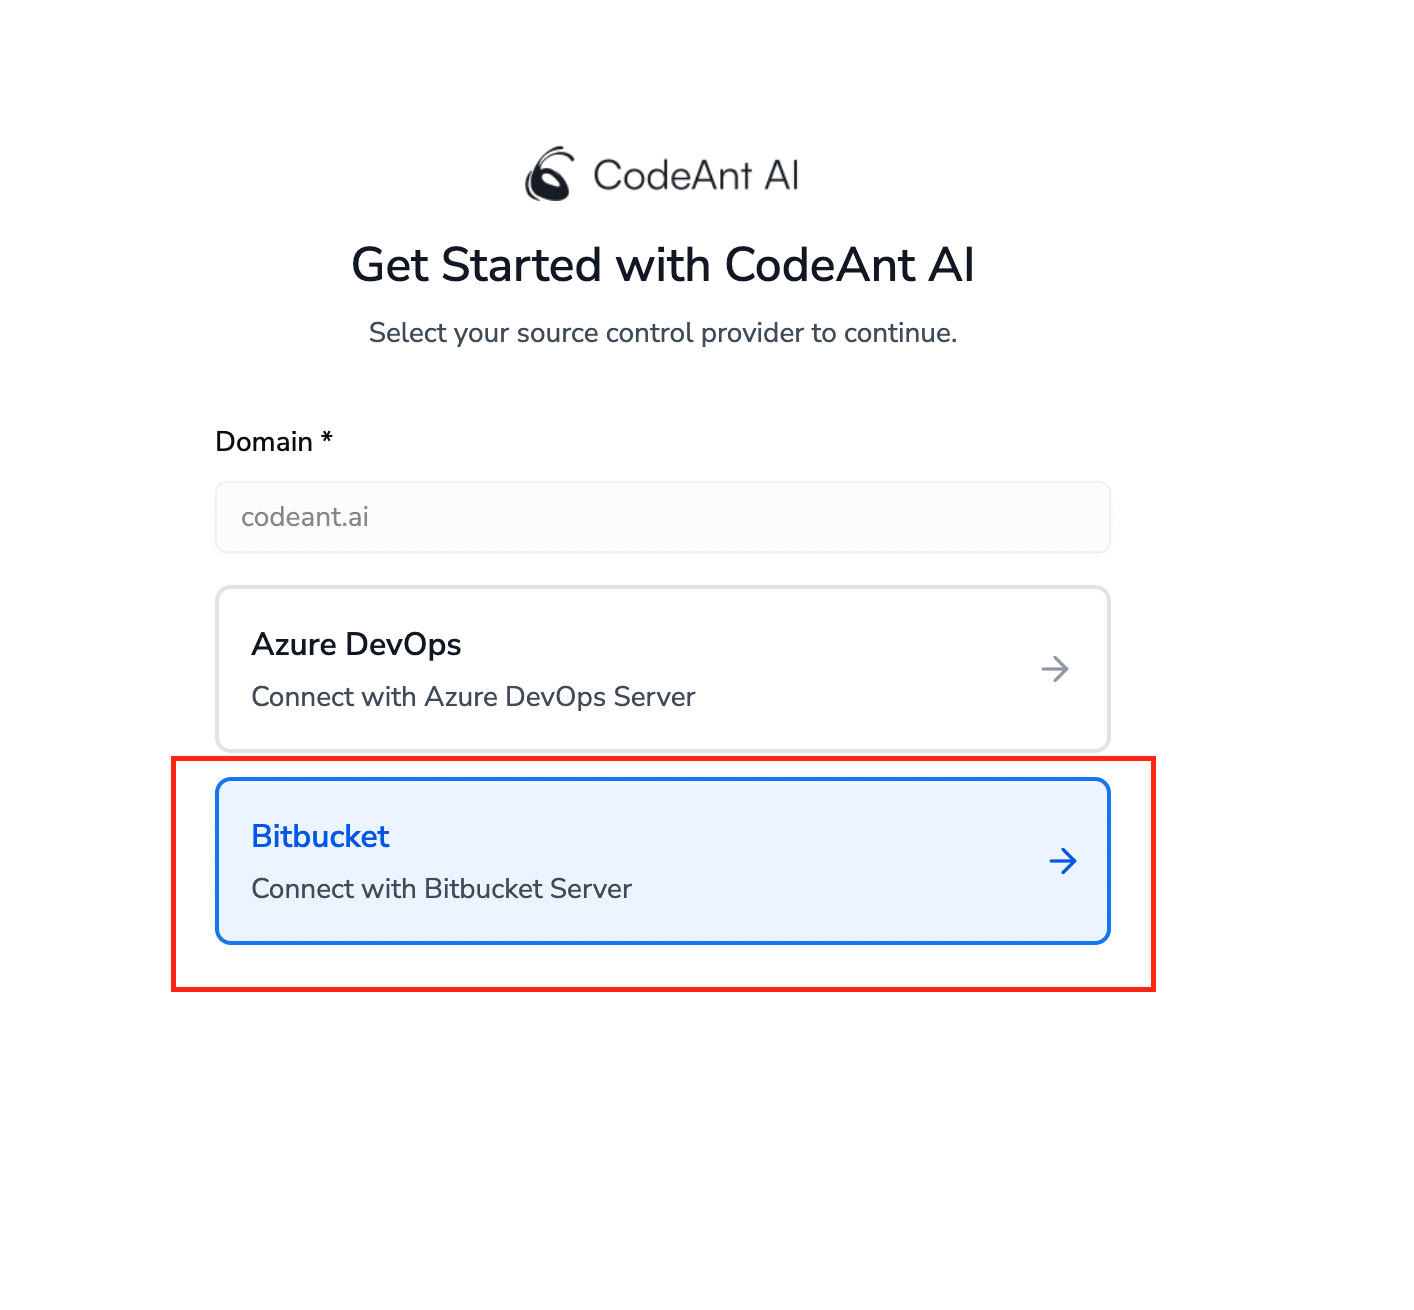
 * Select **Bitbucket** to connect with your Bitbucket Data Center instance.
 ## Step 3: Create an HTTP Access Token in Bitbucket Data Center
* Navigate to your Bitbucket Data Center instance.
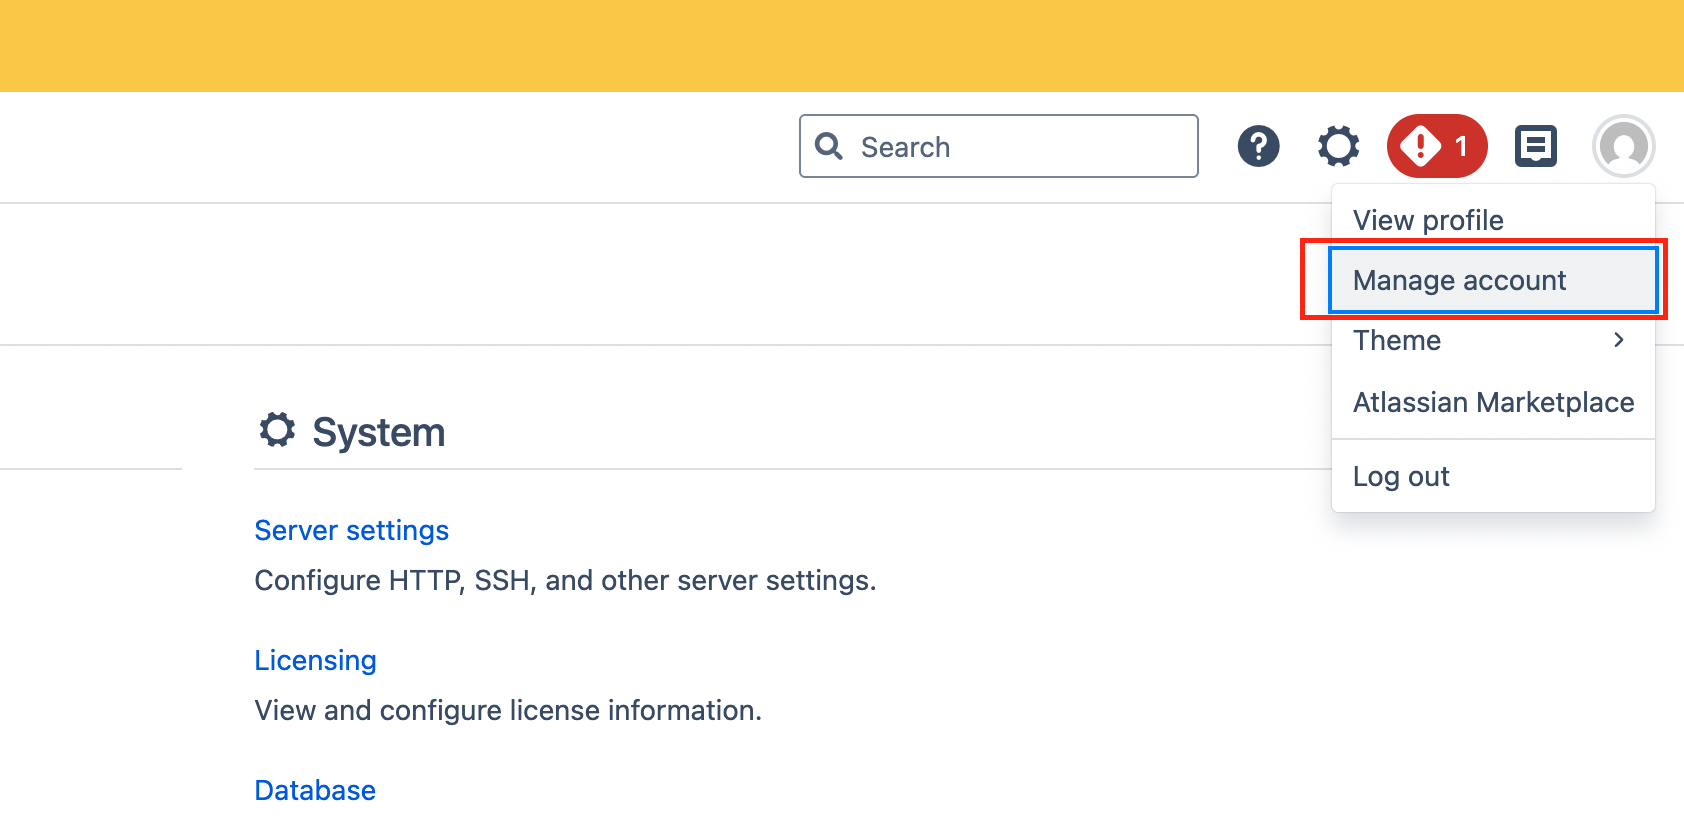
* Click on your **profile icon** in the top right corner and select **Manage account**.
## Step 3: Create an HTTP Access Token in Bitbucket Data Center
* Navigate to your Bitbucket Data Center instance.
* Click on your **profile icon** in the top right corner and select **Manage account**.
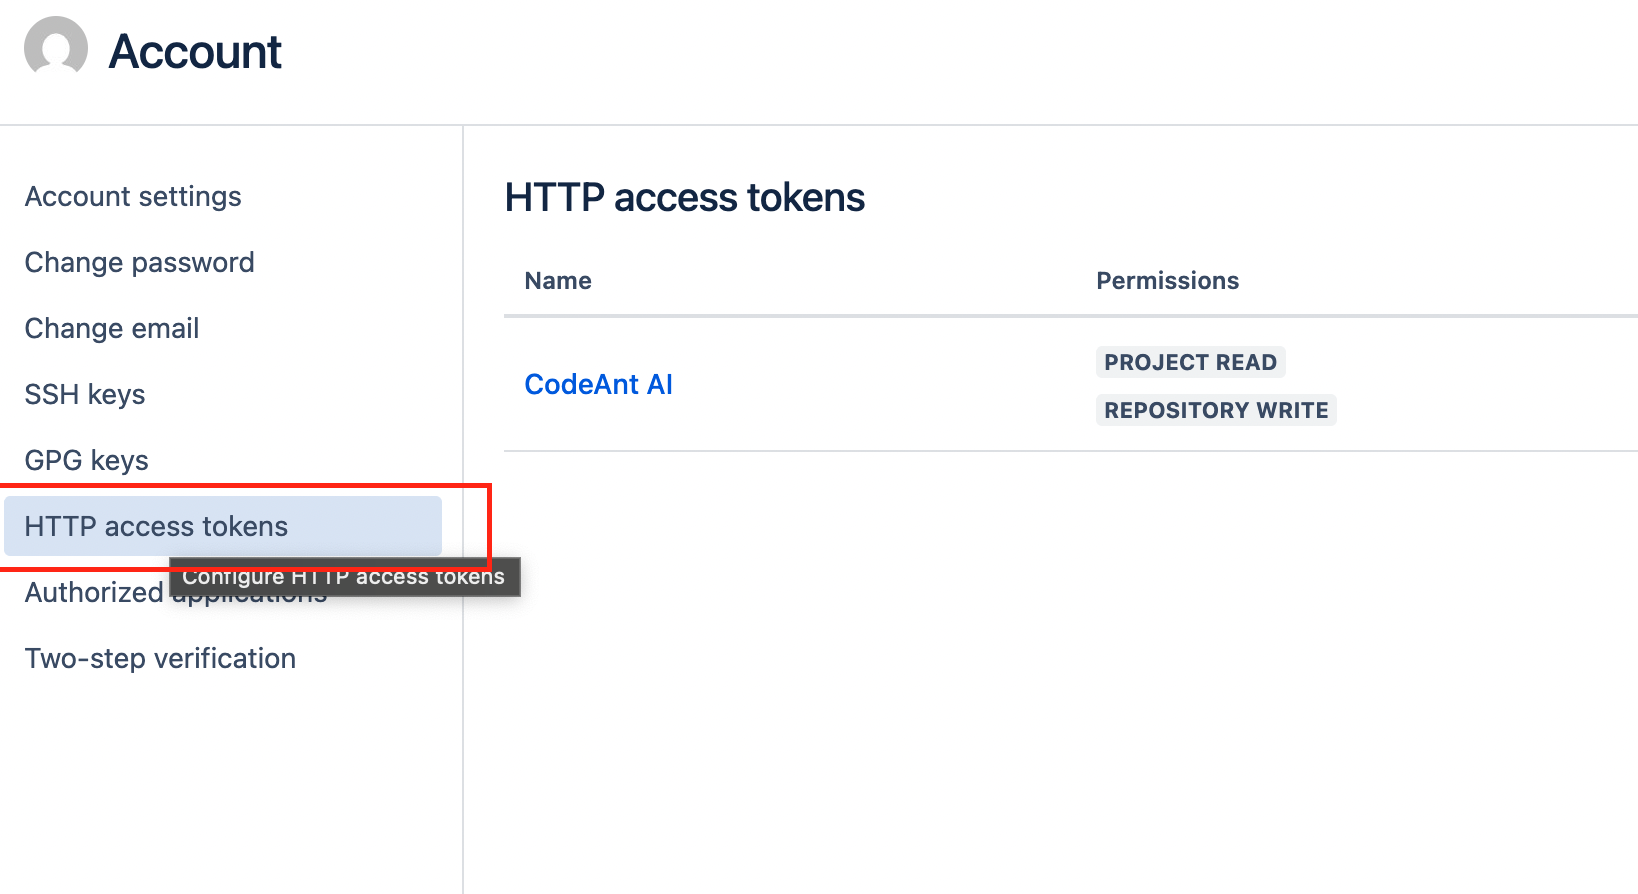
 * In the account settings, select **HTTP access tokens** from the left sidebar.
 * Click on **Create token** and configure the token:
* **Token name:** CodeAnt AI
* **Expiry:** Choose the maximum duration available (or select "Do not expire" if available).
* **Permissions:**
* **Project permissions:** Project read
* **Repository permissions:** Repository write
* Click on **Create token** and configure the token:
* **Token name:** CodeAnt AI
* **Expiry:** Choose the maximum duration available (or select "Do not expire" if available).
* **Permissions:**
* **Project permissions:** Project read
* **Repository permissions:** Repository write
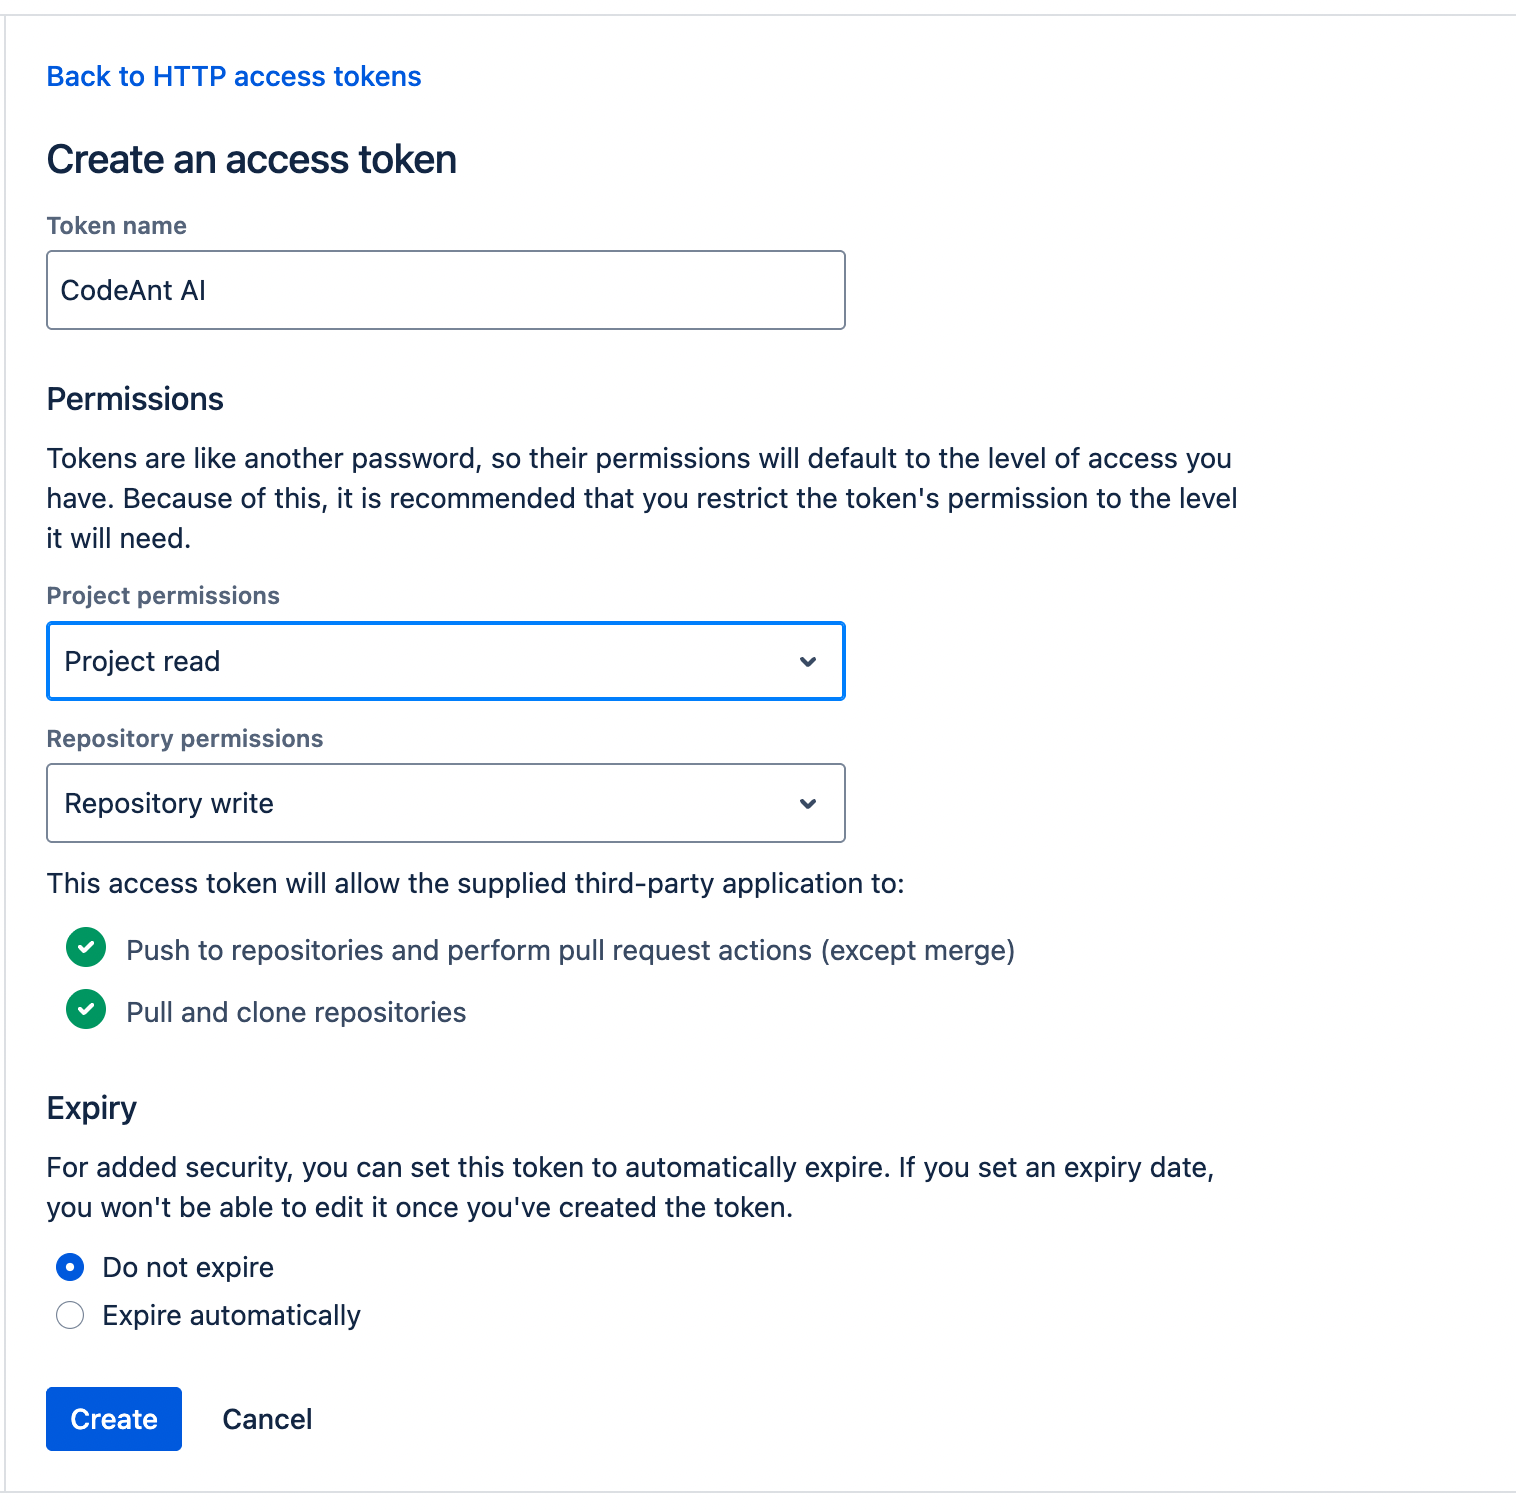 * Click **Create** and copy the generated token immediately (you won't be able to see it again).
## Step 4: Enter Your Bitbucket Data Center Details in CodeAnt AI
* Return to the CodeAnt AI setup page.
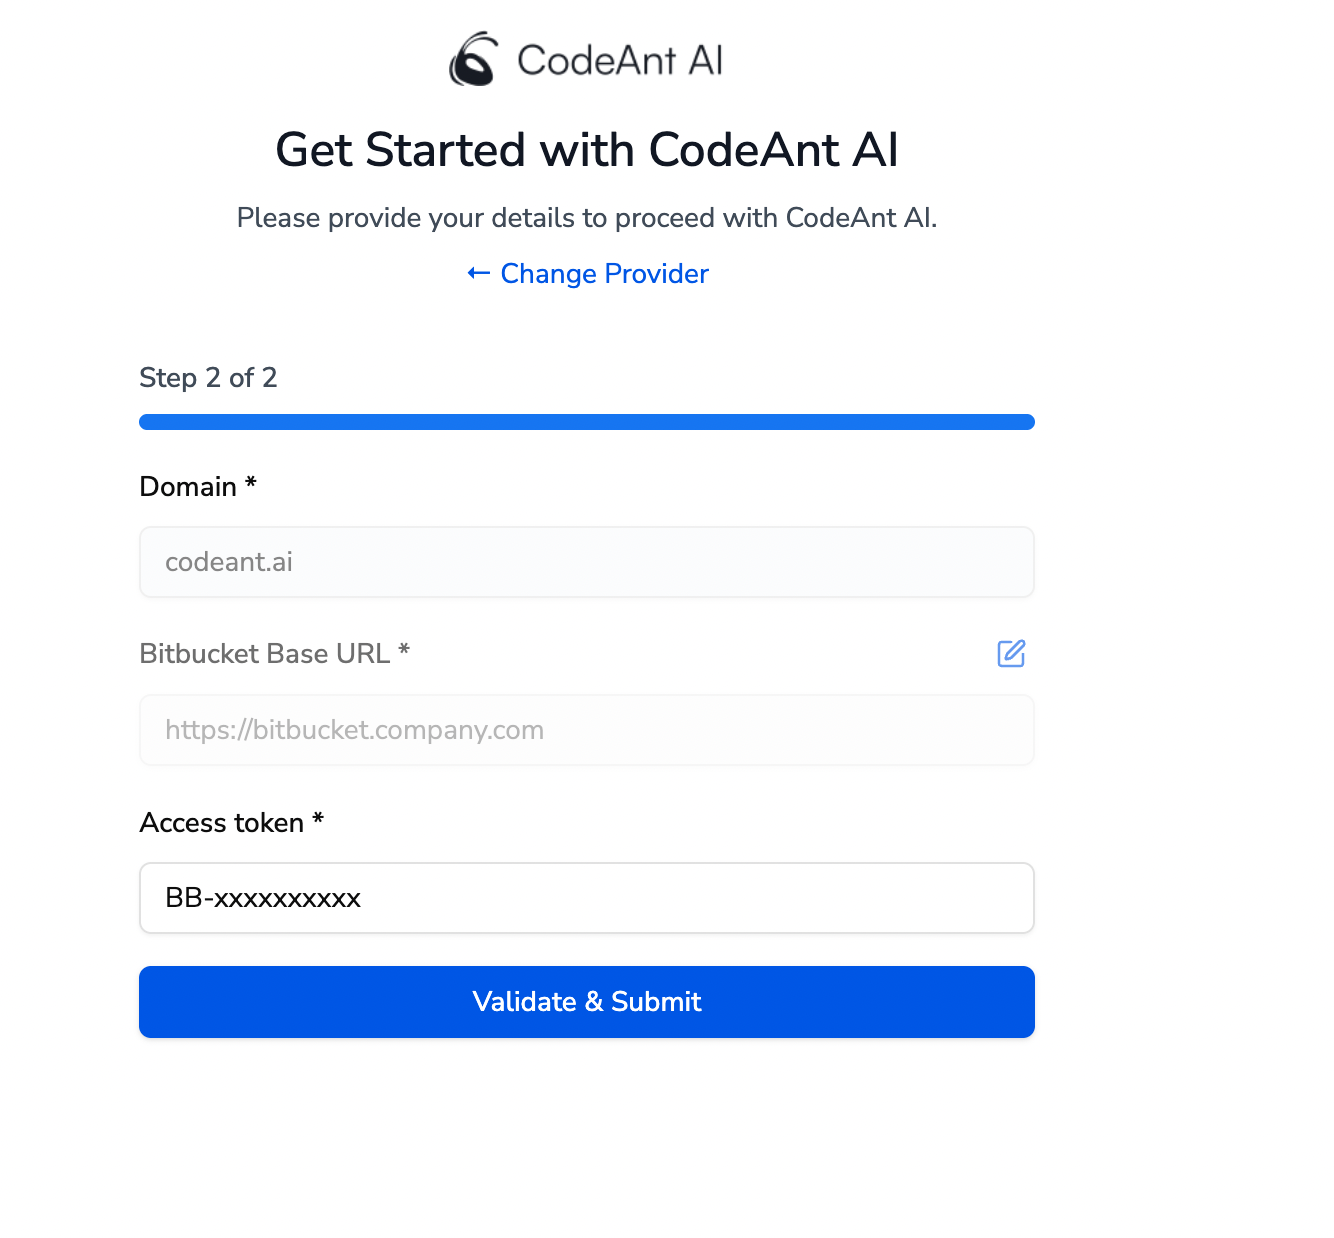
* Enter the following information:
* **Domain:** Your company domain (e.g., `codeant.ai`)
* **Bitbucket Base URL:** The base URL of your self-hosted Bitbucket Data Center instance (e.g., `https://bitbucket.company.com`)
* **Access token:** Paste the HTTP access token you created in the previous step
* Click **Create** and copy the generated token immediately (you won't be able to see it again).
## Step 4: Enter Your Bitbucket Data Center Details in CodeAnt AI
* Return to the CodeAnt AI setup page.
* Enter the following information:
* **Domain:** Your company domain (e.g., `codeant.ai`)
* **Bitbucket Base URL:** The base URL of your self-hosted Bitbucket Data Center instance (e.g., `https://bitbucket.company.com`)
* **Access token:** Paste the HTTP access token you created in the previous step
 ## Step 5: Validate and Submit
* Review all the entered information.
* Click **Validate & Submit**.
* If everything is correct, your projects and repositories will be fetched and displayed in CodeAnt AI.
***
# Pull Request Review Configuration
After completing the initial setup, configure webhooks to enable CodeAnt AI's pull request review capabilities. Follow these steps to set up webhooks for your Bitbucket Data Center project:
## Step 1: Navigate to Project Settings
* Go to your Bitbucket Data Center instance.
* Select the **Project** you want to configure.
* Click on **Project settings** (gear icon in the left sidebar).
## Step 5: Validate and Submit
* Review all the entered information.
* Click **Validate & Submit**.
* If everything is correct, your projects and repositories will be fetched and displayed in CodeAnt AI.
***
# Pull Request Review Configuration
After completing the initial setup, configure webhooks to enable CodeAnt AI's pull request review capabilities. Follow these steps to set up webhooks for your Bitbucket Data Center project:
## Step 1: Navigate to Project Settings
* Go to your Bitbucket Data Center instance.
* Select the **Project** you want to configure.
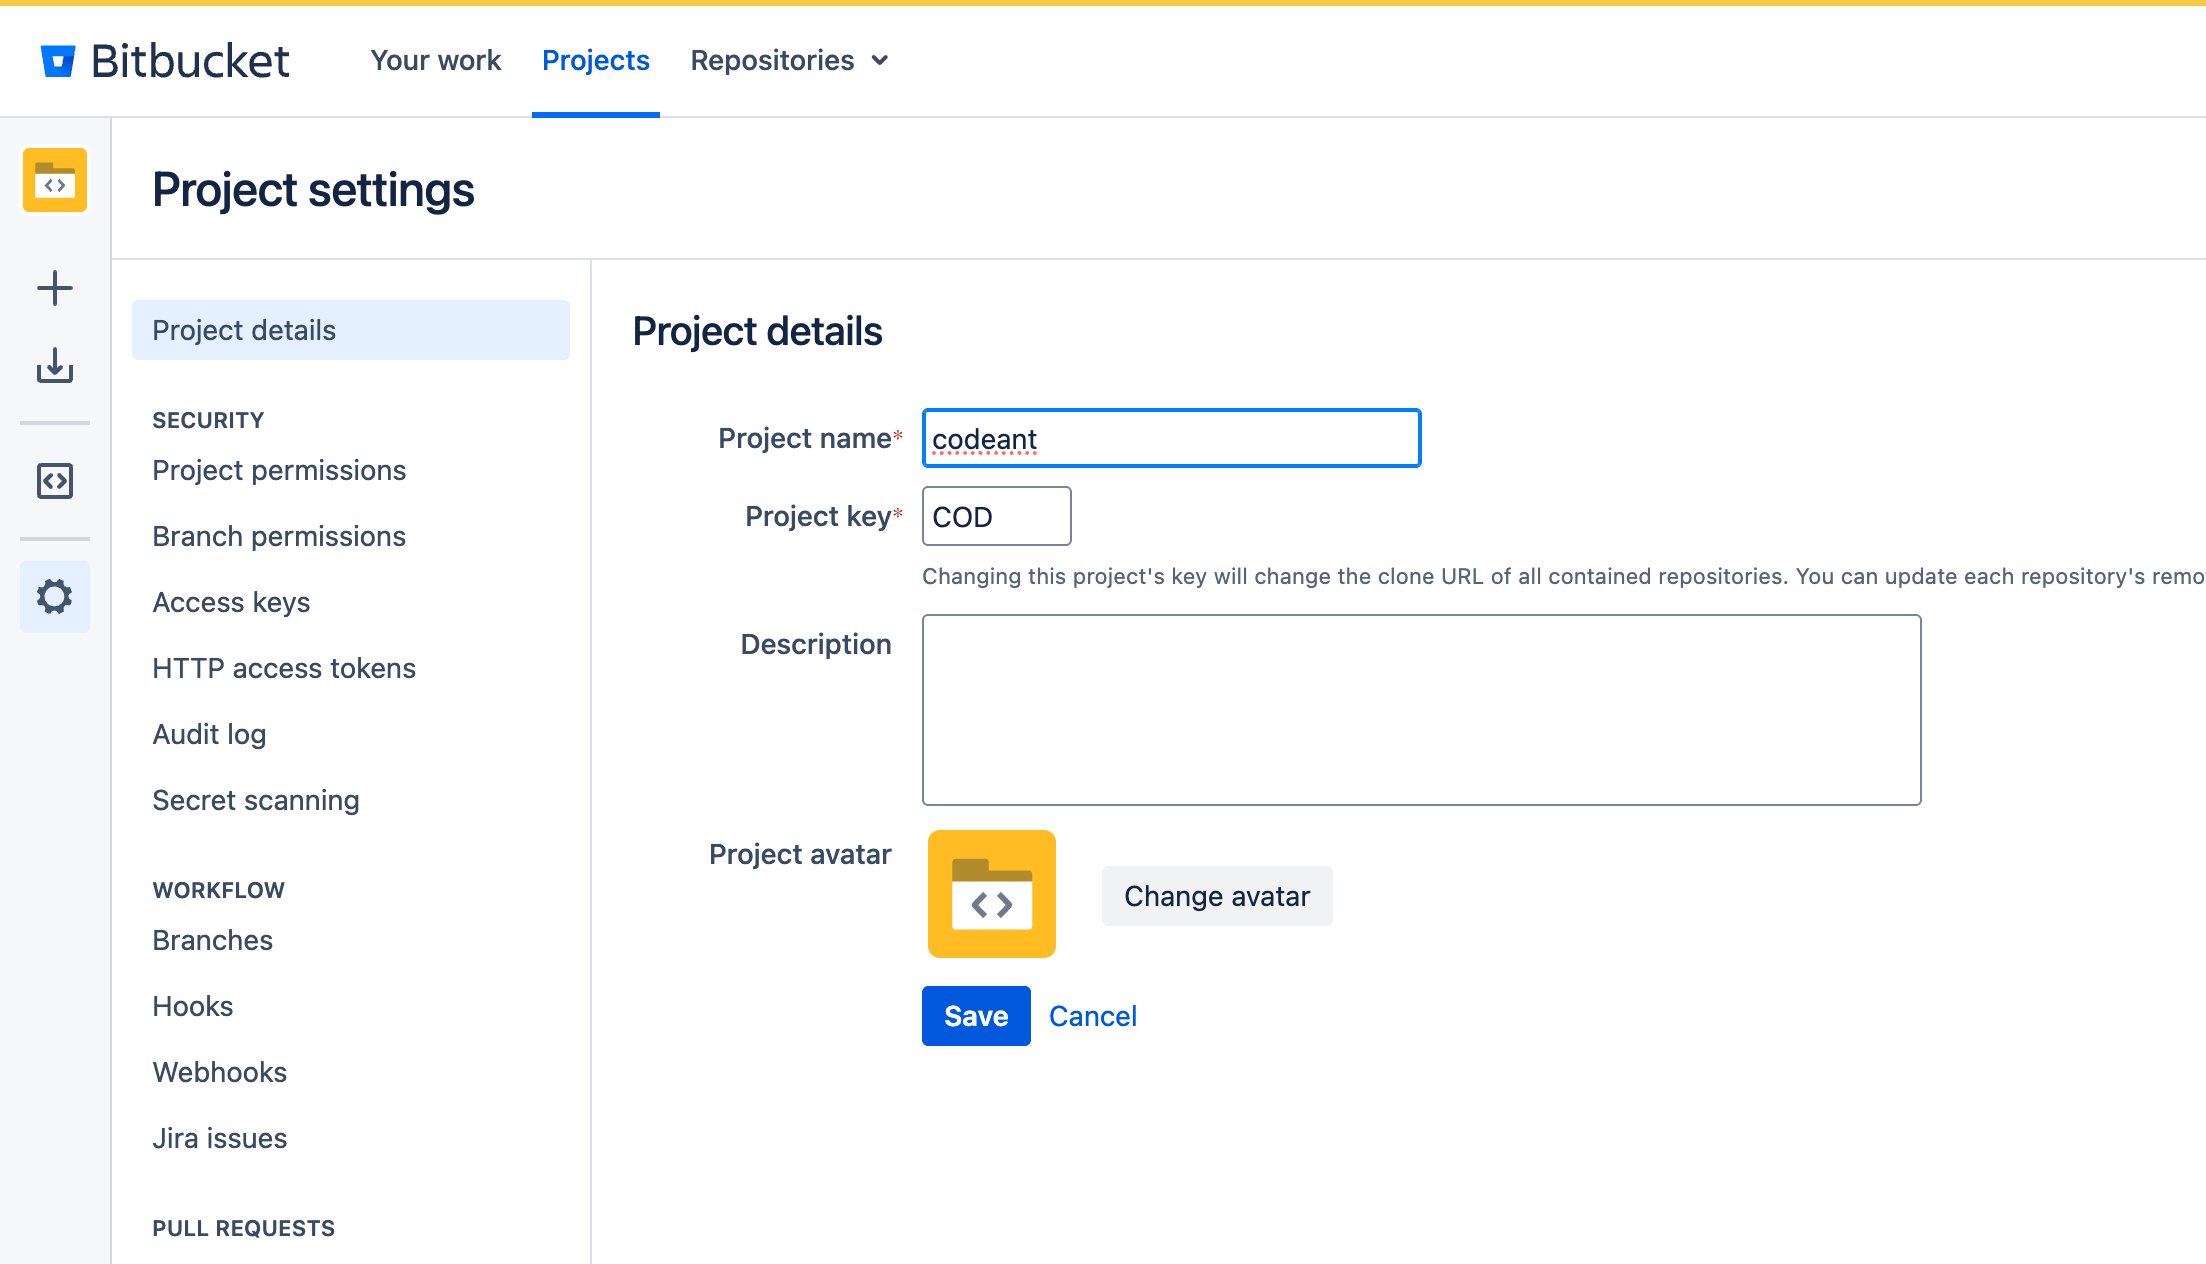
* Click on **Project settings** (gear icon in the left sidebar).
 ## Step 2: Access Webhooks
* In the project settings sidebar, scroll down to the **WORKFLOW** section.
* Click on **Webhooks**.
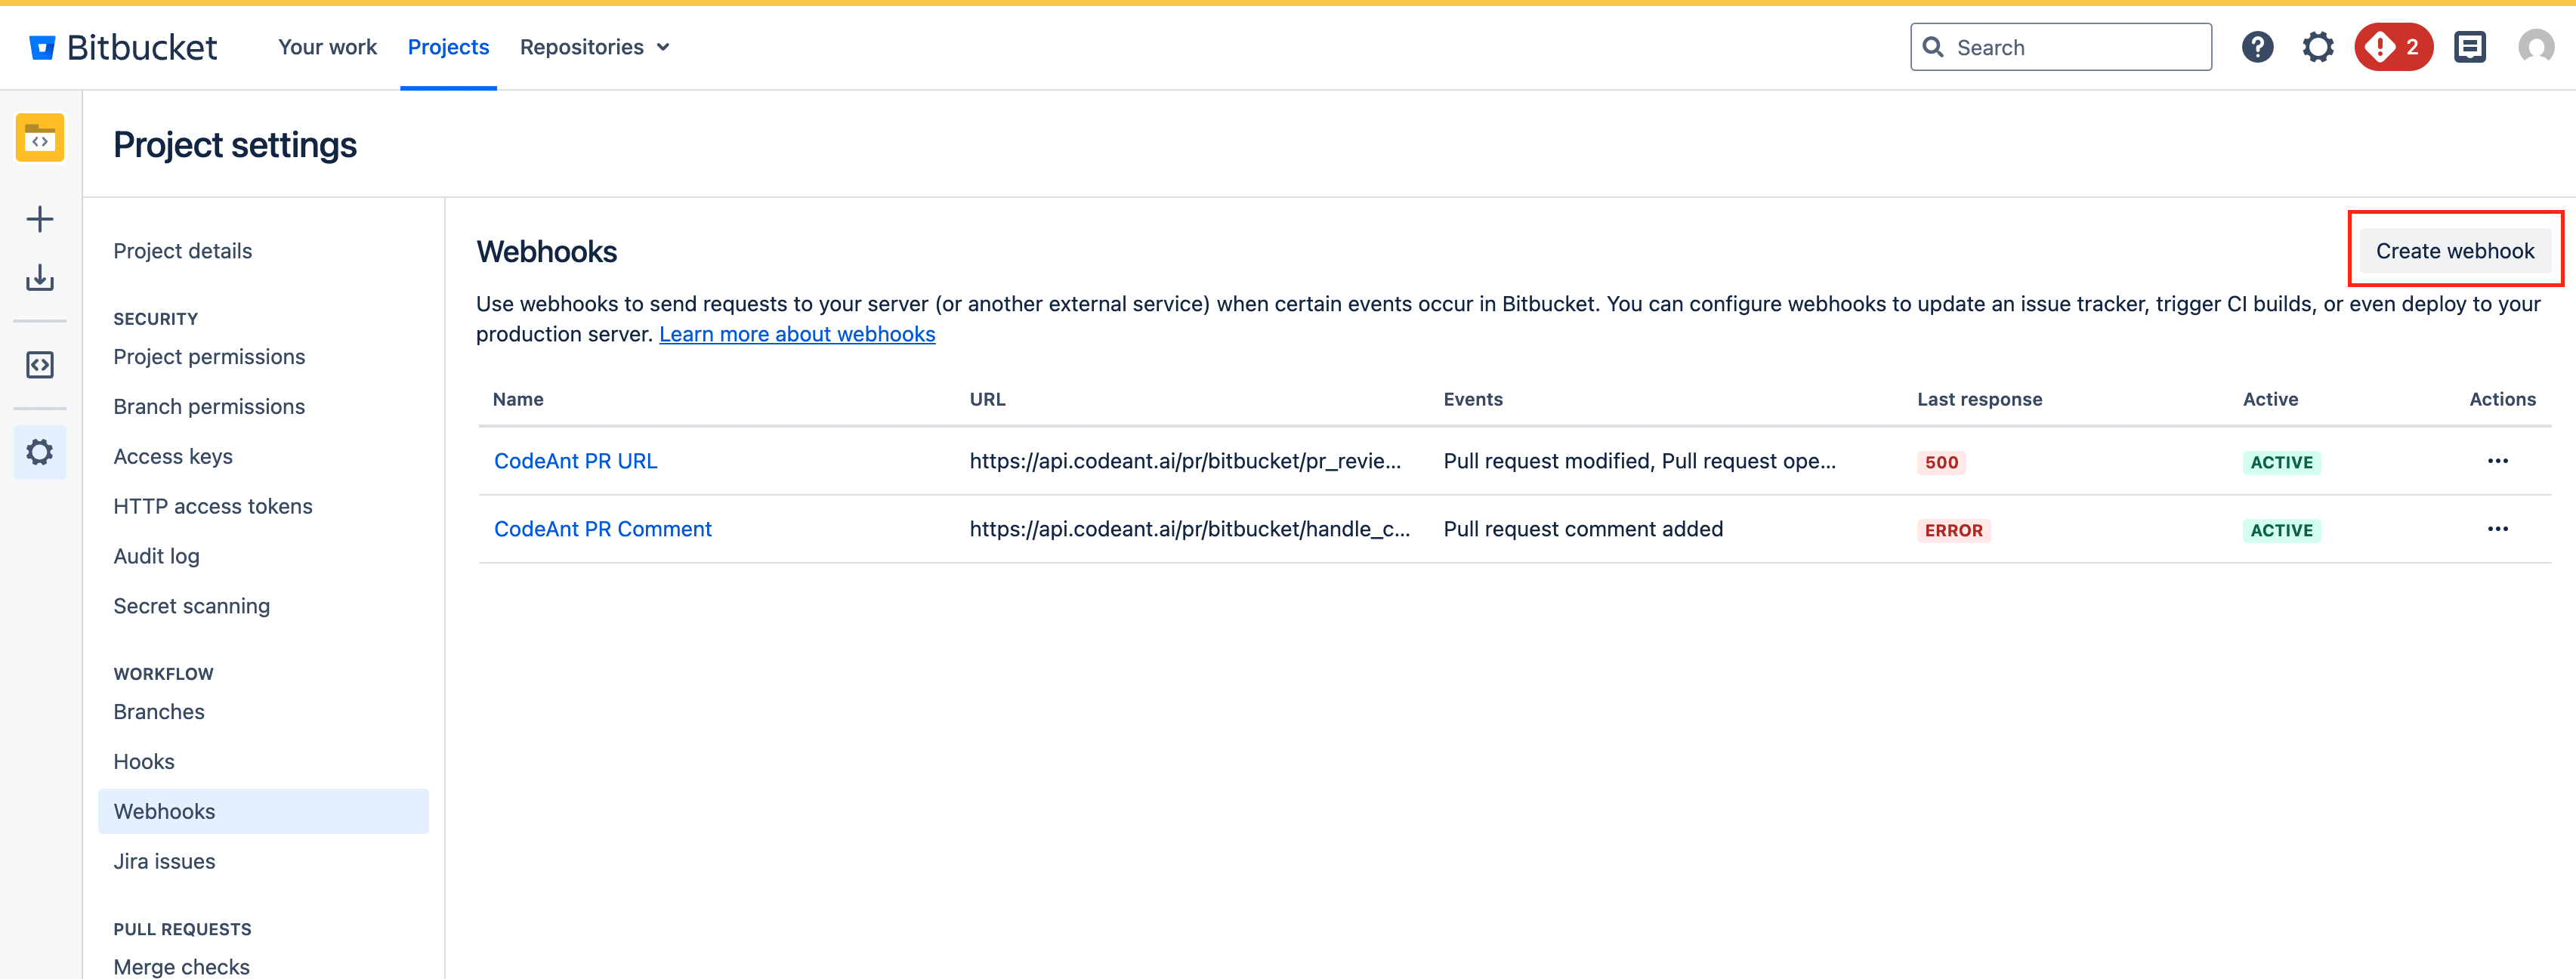
* Click the **Create webhook** button in the top right corner.
## Step 2: Access Webhooks
* In the project settings sidebar, scroll down to the **WORKFLOW** section.
* Click on **Webhooks**.
* Click the **Create webhook** button in the top right corner.
 ## Step 3: Create Webhook for Pull Request Review
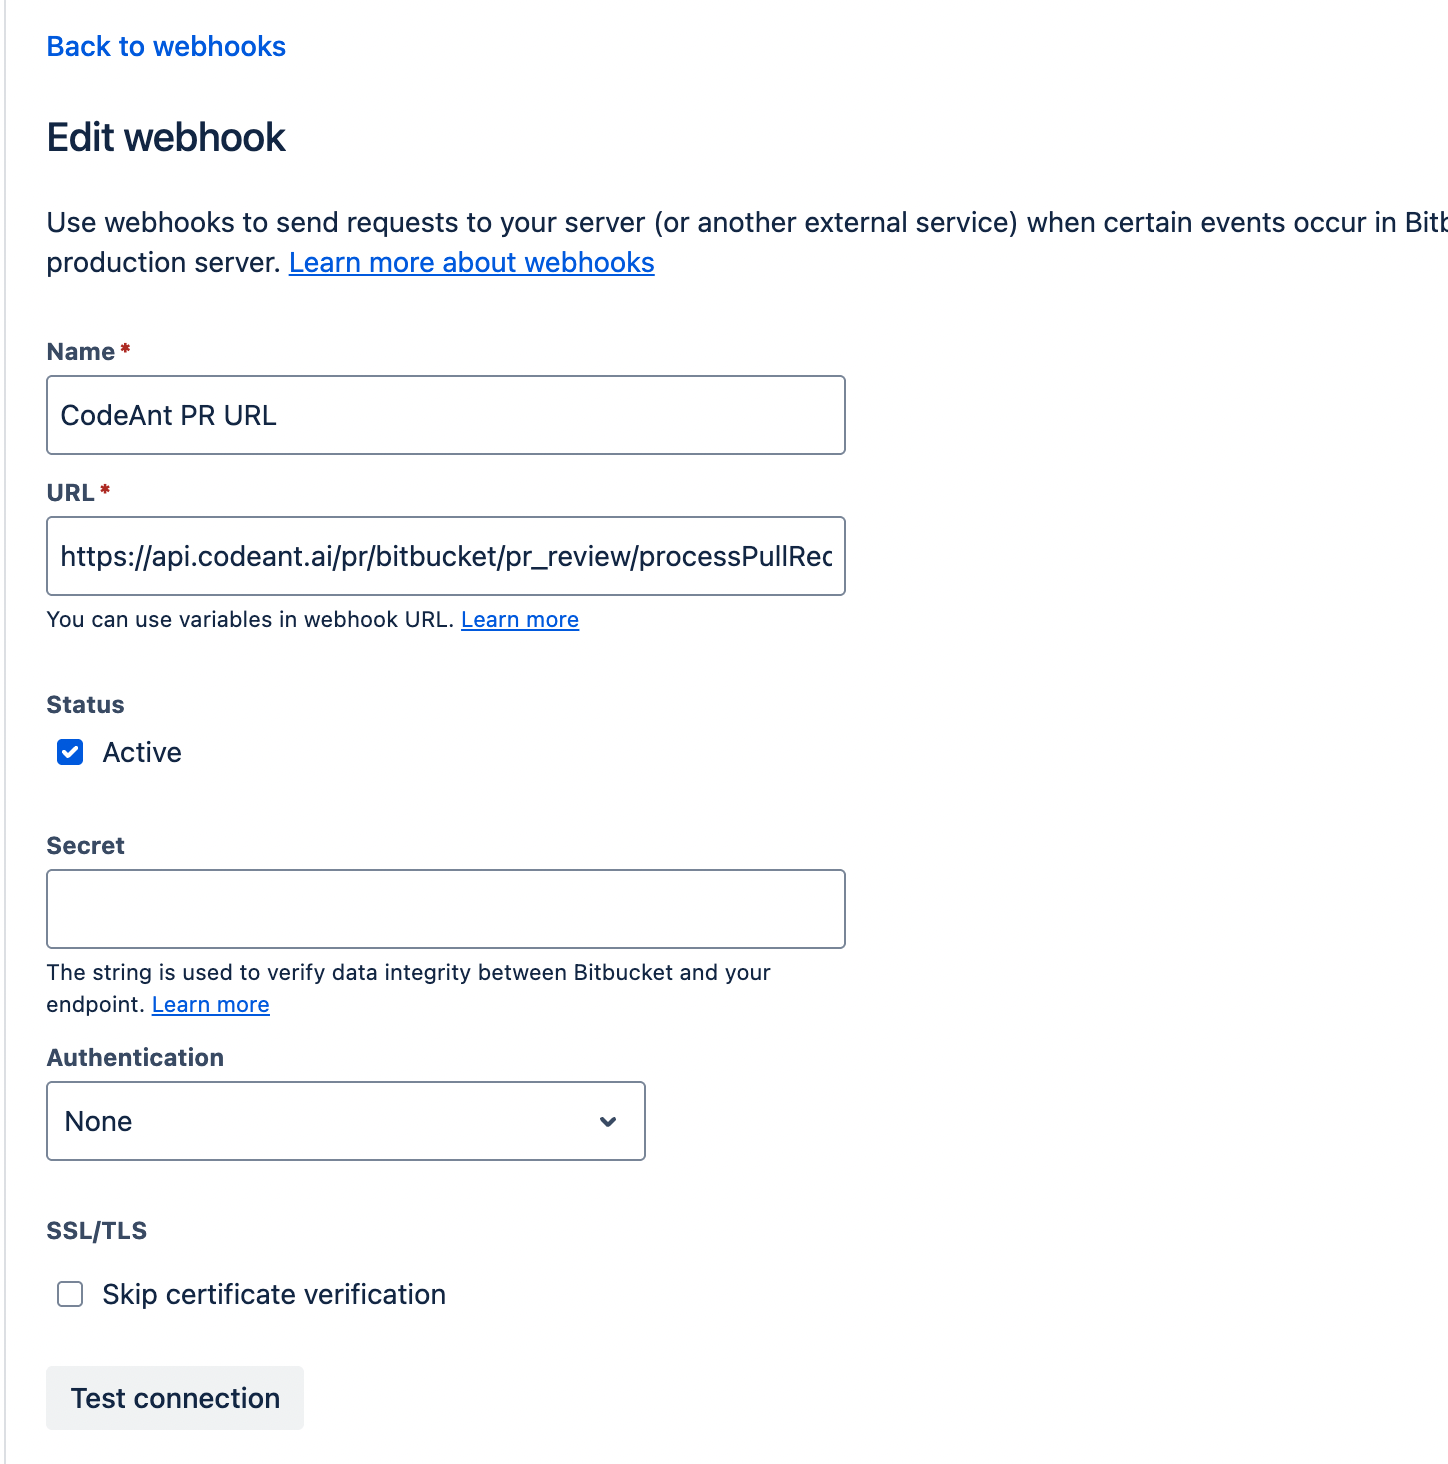
Configure the first webhook to handle pull request events:
* **Name:** CodeAnt PR Review
* **URL:** `https://api.codeant.ai/pr/bitbucket/pr_review/processPullRequestBitbucket`
* **Status:** Check **Active**
* **SSL/TLS:** Leave "Skip certificate verification" unchecked (recommended for security)
* **Authentication:** None
## Step 3: Create Webhook for Pull Request Review
Configure the first webhook to handle pull request events:
* **Name:** CodeAnt PR Review
* **URL:** `https://api.codeant.ai/pr/bitbucket/pr_review/processPullRequestBitbucket`
* **Status:** Check **Active**
* **SSL/TLS:** Leave "Skip certificate verification" unchecked (recommended for security)
* **Authentication:** None
 ### Select Pull Request Events
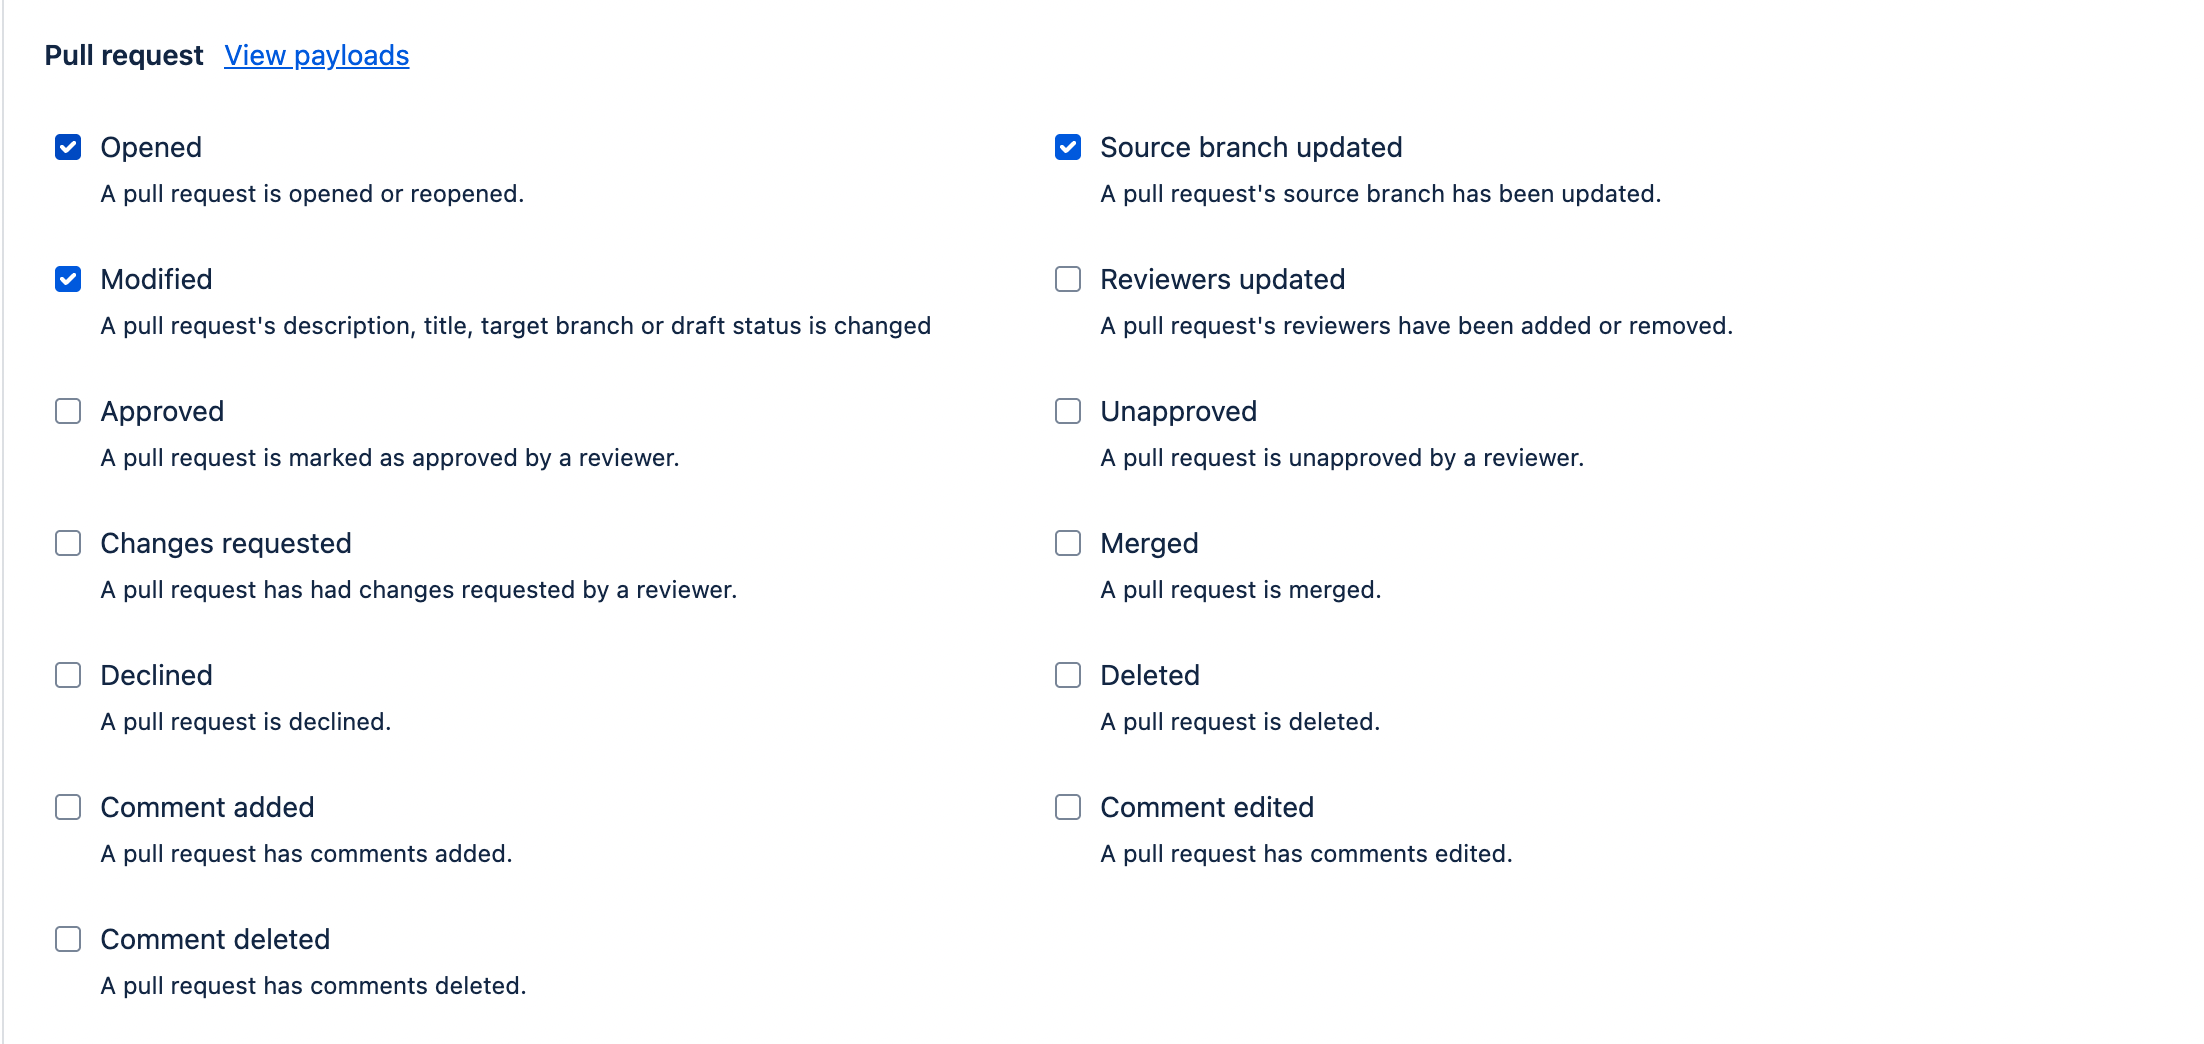
Under the **Pull request** section, select the following events:
* **Opened** - A pull request is opened or reopened
* **Modified** - A pull request's description, title, target branch or draft status is changed
* **Source branch updated** - A pull request's source branch has been updated
### Select Pull Request Events
Under the **Pull request** section, select the following events:
* **Opened** - A pull request is opened or reopened
* **Modified** - A pull request's description, title, target branch or draft status is changed
* **Source branch updated** - A pull request's source branch has been updated
 * Click **Save** to create the webhook.
## Step 4: Create Webhook for Pull Request Comments
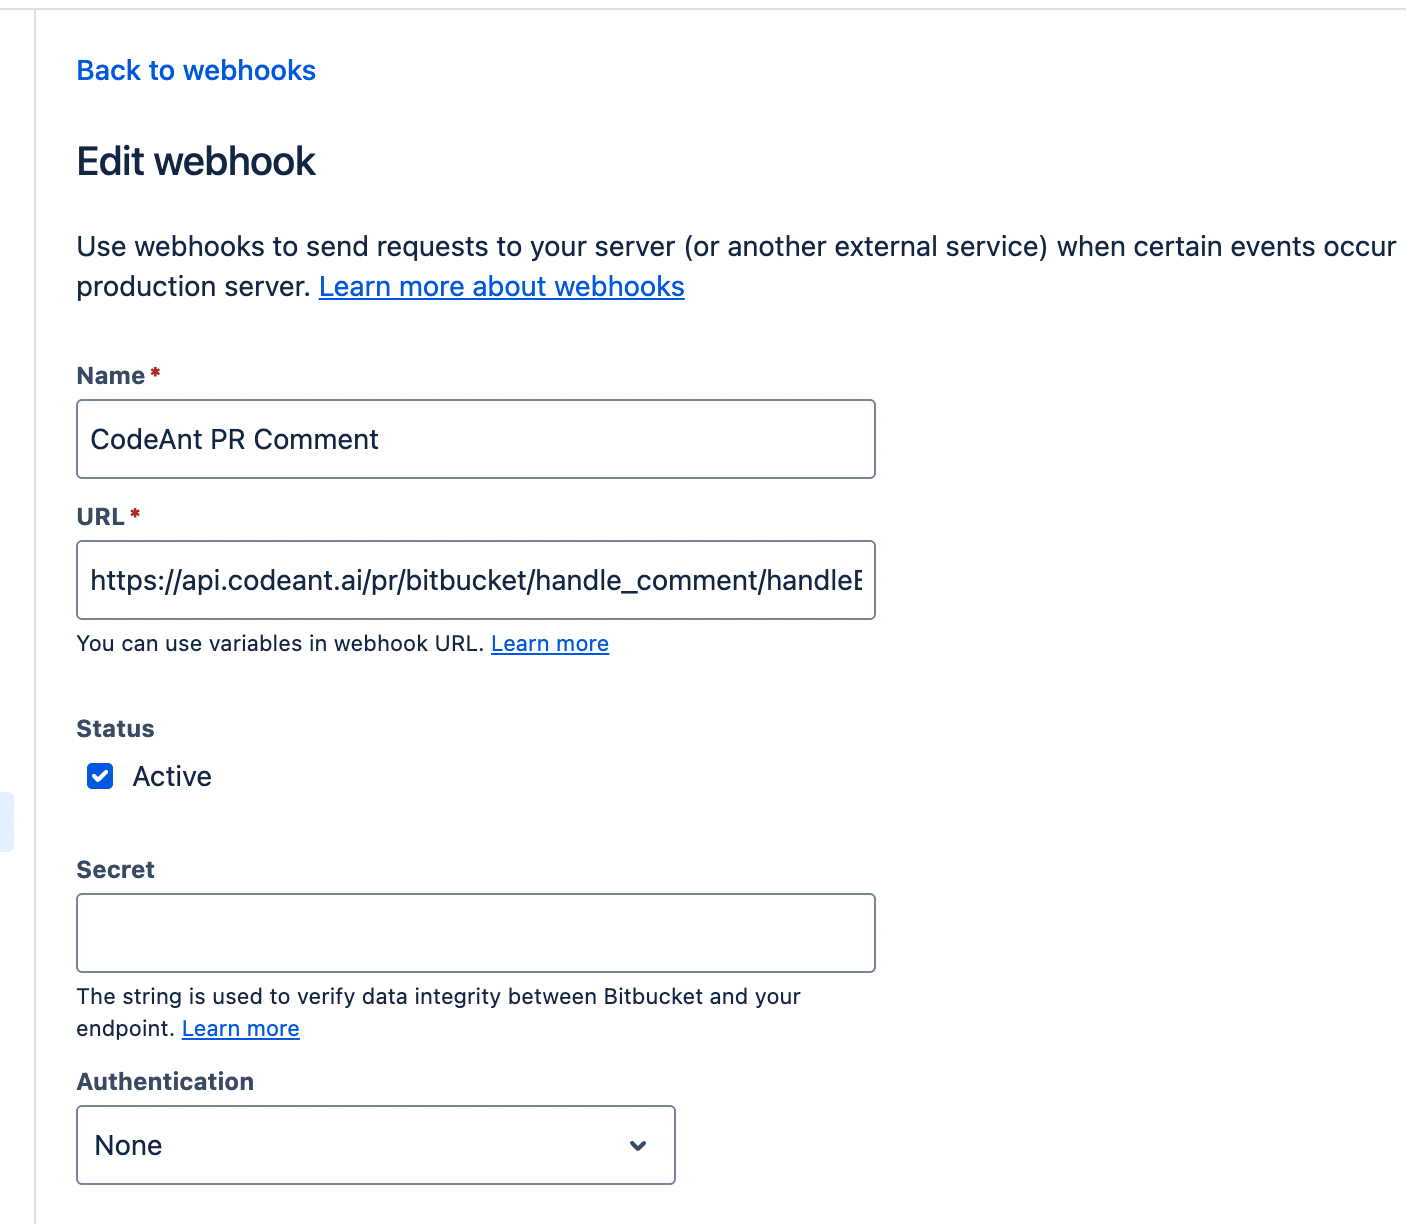
Configure the second webhook to handle pull request comment events for question answering:
* Click **Create webhook** again to add another webhook.
* **Name:** CodeAnt PR Comment
* **URL:** `https://api.codeant.ai/pr/bitbucket/handle_comment/handleBitBucketPRComment`
* **Status:** Check **Active**
* **SSL/TLS:** Leave "Skip certificate verification" unchecked
* **Authentication:** None
* Click **Save** to create the webhook.
## Step 4: Create Webhook for Pull Request Comments
Configure the second webhook to handle pull request comment events for question answering:
* Click **Create webhook** again to add another webhook.
* **Name:** CodeAnt PR Comment
* **URL:** `https://api.codeant.ai/pr/bitbucket/handle_comment/handleBitBucketPRComment`
* **Status:** Check **Active**
* **SSL/TLS:** Leave "Skip certificate verification" unchecked
* **Authentication:** None
 ### Select Comment Events
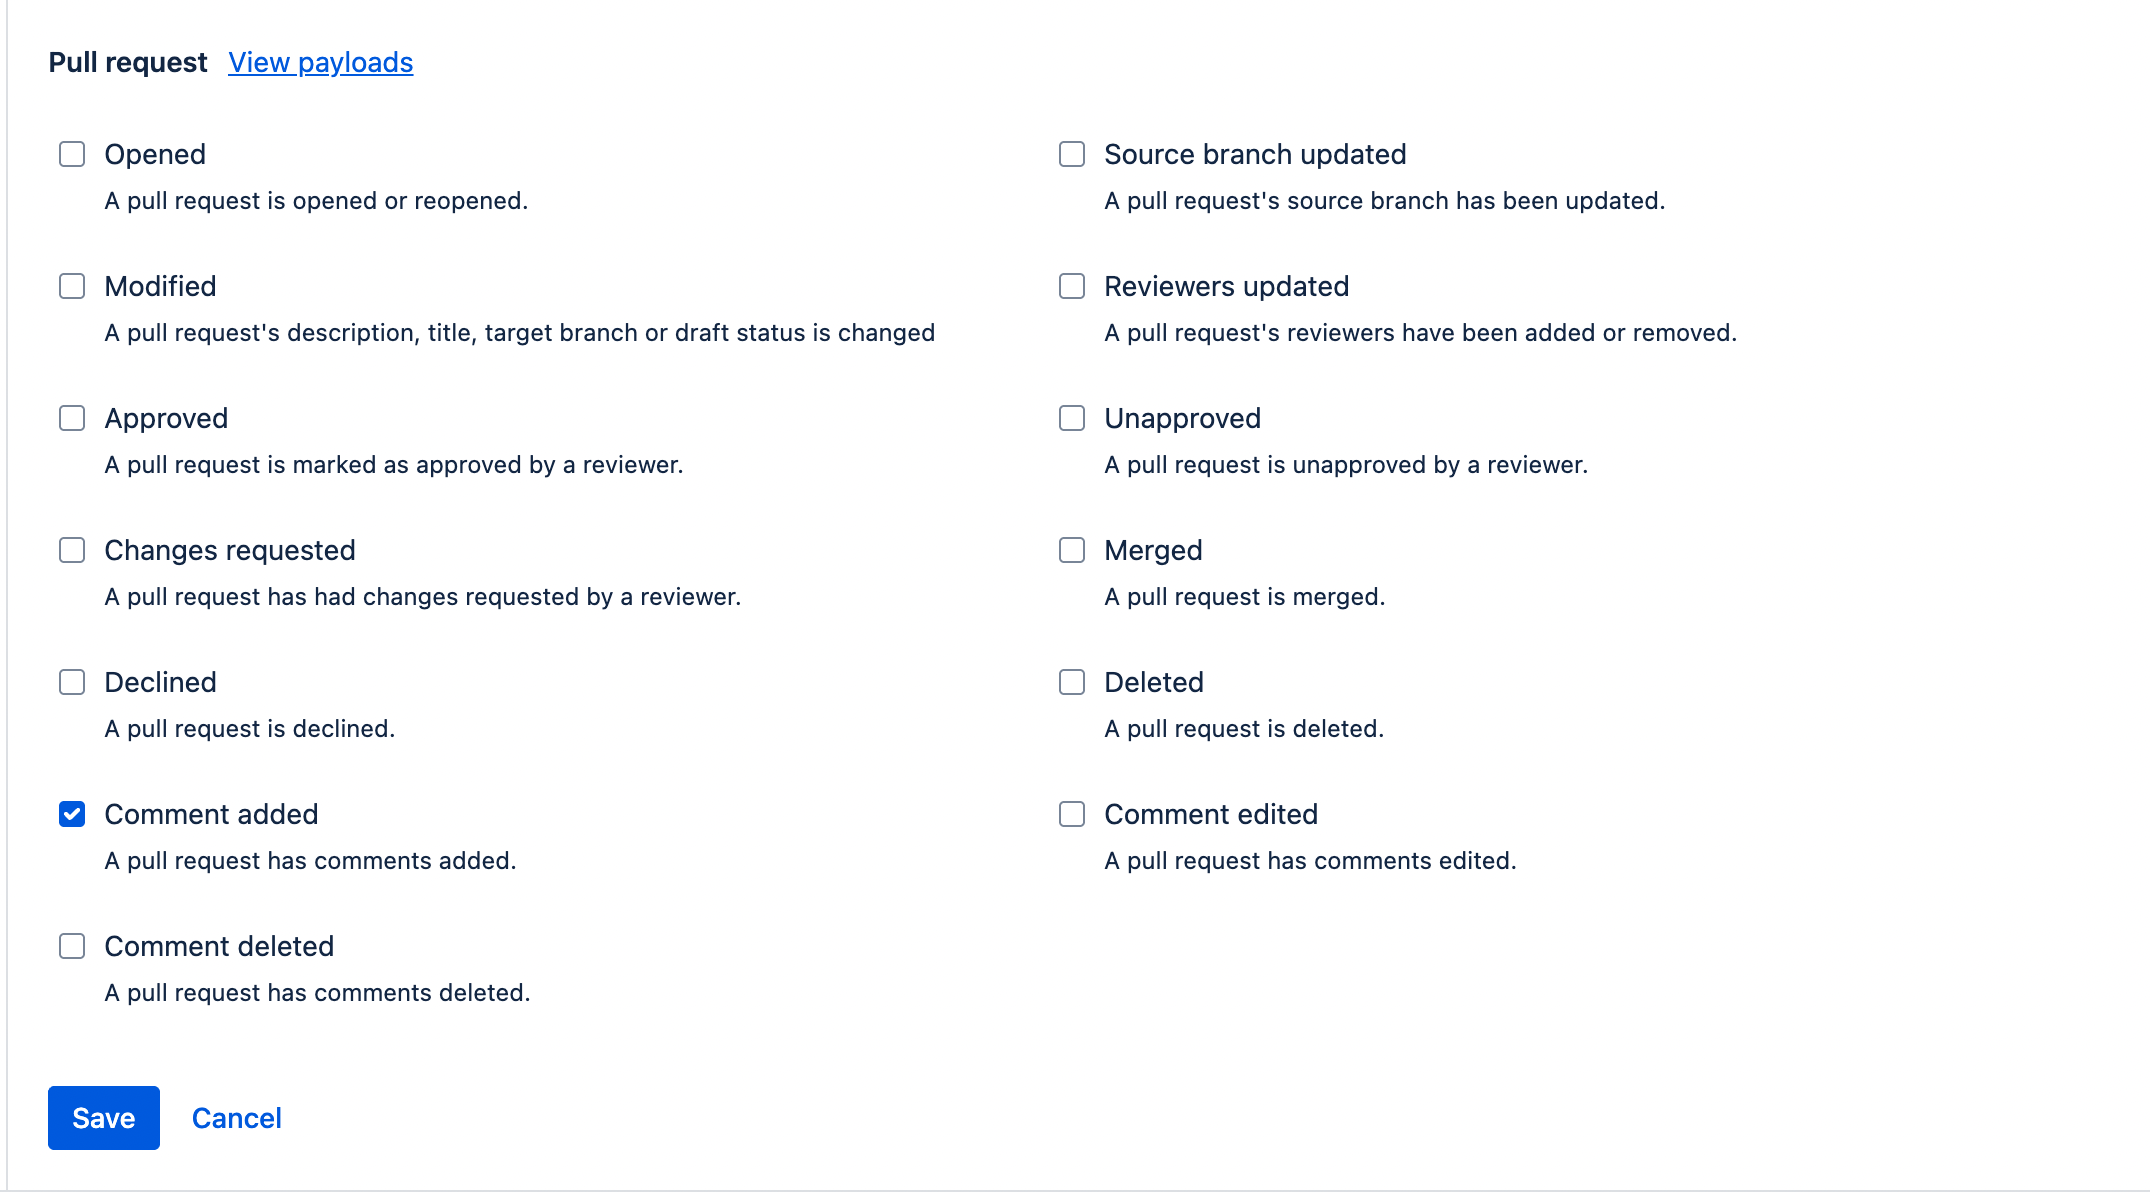
Under the **Pull request** section, select the following event:
* **Comment added** - A pull request has comments added
### Select Comment Events
Under the **Pull request** section, select the following event:
* **Comment added** - A pull request has comments added
 * Click **Save** to create the webhook.
## Step 5: Verify Webhook Configuration
After creating both webhooks, you should see them listed in the Webhooks page:
1. **CodeAnt PR URL** - For pull request events (Opened, Modified, Source branch updated)
2. **CodeAnt PR Comment** - For pull request comment events (Comment added)
Both webhooks should show as **ACTIVE** status.
Your pull requests will now be automatically reviewed by CodeAnt AI whenever:
* A new pull request is opened
* An existing pull request is modified or updated
* Comments are added to pull requests (for AI-powered question answering)
* Click **Save** to create the webhook.
## Step 5: Verify Webhook Configuration
After creating both webhooks, you should see them listed in the Webhooks page:
1. **CodeAnt PR URL** - For pull request events (Opened, Modified, Source branch updated)
2. **CodeAnt PR Comment** - For pull request comment events (Comment added)
Both webhooks should show as **ACTIVE** status.
Your pull requests will now be automatically reviewed by CodeAnt AI whenever:
* A new pull request is opened
* An existing pull request is modified or updated
* Comments are added to pull requests (for AI-powered question answering)